Discover our range of Timing Vacuum Solenoid Sensors, designed to enhance your vehicle’s performance and reliability. These sensors play a critical role in regulating the timing and flow of air and exhaust gases in the engine, which can significantly impact fuel efficiency and emissions.
-

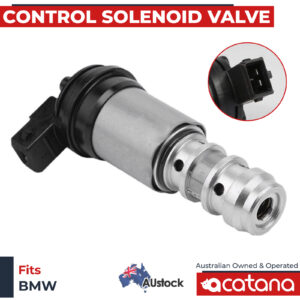
This Timing Vanos Control Solenoid Valve will seamlessly fit your BMW 5 E60 550i 2005 – 2009 11367560462
-
This Timing Vanos Control Solenoid Valve will seamlessly fit your BMW 6 E64 650i 2005 – 2009 11367560462
-
This Timing Vanos Control Solenoid Valve will seamlessly fit your For BMW 7 E65 E66 E67 745i Li 11367560462
-
This Timing Vanos Control Solenoid Valve will seamlessly fit your BMW X5 E53 4.8is 2004 – 2006 11367560462
-
Timing Vanos Control Solenoid Valve will seamlessly fit your BMW 1 E87 118i 2004 – 2011. Engine runs smoothly. Easy to install reliable replacement Reference OEM 11367560462 1361707323 11360149817
-
Timing Vanos Control Solenoid Valve will seamlessly fit your BMW 1 E87 120i 2004 – 2011. Engine runs smoothly. Easy to install reliable replacement Reference OEM 11367560462 1361707323 11360149817
-
Timing Vanos Control Solenoid Valve will seamlessly fit your BMW 1 E88 120i 2008 – 2013. Engine runs smoothly. Easy to install reliable replacement Reference OEM 11367560462 1361707323 11360149817
-
Timing Vanos Control Solenoid Valve will seamlessly fit your BMW 3 E90 318i 2005 – 2007. Engine runs smoothly. Easy to install reliable replacement Reference OEM 11367560462 1361707323 11360149817
-
Timing Vanos Control Solenoid Valve will seamlessly fit your BMW 3 E92 320i 2007 – 2012. Engine runs smoothly. Easy to install reliable replacement Reference OEM 11367560462 1361707323 11360149817
-
Timing Vanos Control Solenoid Valve will seamlessly fit your BMW 3 E93 320i 2007 – 2012. Engine runs smoothly. Easy to install reliable replacement Reference OEM 11367560462 1361707323 11360149817
-
Timing Vanos Control Solenoid Valve will seamlessly fit your BMW 7 Series F01 F02 F03 F04 750i Li. Engine runs smoothly. Easy to install reliable replacement Reference OEM 11367560462 1361707323 11360149817
-
Timing Vanos Control Solenoid Valve will seamlessly fit your BMW E82 E87 E60 E90 E70 E46. Engine runs smoothly. Easy to install reliable replacement Reference OEM 11367560462 1361707323 11360149817
-
Timing Vanos Control Solenoid Valve will seamlessly fit your BMW X1 E84 sDrive 18i SUV. Engine runs smoothly. Easy to install reliable replacement Reference OEM 11367560462 1361707323 11360149817
-
Timing Vanos Control Solenoid Valve will seamlessly fit your BMW X5 E70 4.8i xDrive SUV. Engine runs smoothly. Easy to install reliable replacement Reference OEM 11367560462 1361707323 11360149817


ABOUT Timing Vacuum Sensors
What is Timing Vacuum Sensor
Timing vacuum solenoid sensors is the process of adjusting the operation of a vacuum solenoid to control the timing of a particular automotive system. Vacuum solenoid sensors are used in various systems such as the EGR (exhaust gas recirculation) system, air intake control, and other vacuum-powered systems in a vehicle.
The timing of these sensors is critical for their proper functioning and the overall performance of the vehicle. The timing determines when the vacuum solenoid opens or closes, controlling the flow of air or exhaust gases to or from the system.
Timing vacuum solenoid sensors typically involves connecting a vacuum gauge to the system being controlled, starting the engine and observing the vacuum gauge readings. A timing light or oscilloscope may also be used to check the timing of the vacuum solenoid sensor. If the timing is not correct, the sensor or its wiring may need to be adjusted until it operates at the correct timing.
Properly timing vacuum solenoid sensors is important to ensure the optimal performance of the system being controlled and the vehicle as a whole.
What is the symptoms of a broken Timing Vacuum Solenoid?
The symptoms of a broken or malfunctioning timing vacuum solenoid can vary depending on the system it is controlling. However, some common symptoms of a faulty vacuum solenoid sensor include:
- Engine Misfiring: A broken timing vacuum solenoid may cause the engine to misfire or hesitate during acceleration due to a lack of vacuum pressure in the system.
- Rough Idle: A malfunctioning vacuum solenoid can cause the engine to idle roughly or stall, as the system it controls may not be receiving the correct amount of air or exhaust gases.
- Decreased Fuel Efficiency: A faulty vacuum solenoid can cause the engine to consume more fuel than usual, resulting in decreased fuel efficiency.
- Illuminated Check Engine Light: If the vacuum solenoid sensor is not working correctly, it can trigger the check engine light to turn on, indicating a problem with the system.
- Decreased Performance: A broken timing vacuum solenoid can cause decreased performance, as the system it controls may not be operating optimally.
If you suspect that the timing vacuum solenoid is broken or malfunctioning, it's important to have it checked by a qualified mechanic. They can diagnose the problem and determine if the vacuum solenoid needs to be replaced or repaired.
Where is the timing solenoid located?
The location of the timing solenoid depends on the specific system it controls in the vehicle. Timing solenoids are used in various systems such as the EGR (exhaust gas recirculation) system, air intake control, and other vacuum-powered systems.
In general, the timing solenoid is usually located near the component it controls. For example, in the case of an EGR system, the EGR valve and the timing solenoid are often located on or near the intake manifold or the engine block.
To locate the timing solenoid, consult the vehicle's service manual or a reputable mechanic. They can help you identify the location of the solenoid and provide guidance on how to access and test it. It's important to follow the manufacturer's recommended procedures for testing and adjusting the timing solenoid to ensure its proper operation and avoid damage to the vehicle's systems.
How to Replace Variable Valve Timing Solenoid
Replacing a variable valve timing solenoid (VVT solenoid) can vary depending on the specific make and model of the vehicle. However, here are some general steps that may help guide you through the process:
Note: Always consult the vehicle's service manual or a qualified mechanic for specific instructions on replacing the VVT solenoid for your vehicle.
Tools Required:
- Wrenches and sockets (various sizes)
- Pliers
- New VVT Solenoid
- Clean rag
- New engine oil and filter (optional)
Steps:
- Locate the VVT solenoid. The location can vary depending on the make and model of the vehicle, but it is usually located near the engine's valve cover.
- Disconnect the negative battery cable. This is to avoid electrical shock while working on the engine.
- Remove any components or parts that obstruct access to the VVT solenoid. This may include the engine cover, air intake system, and other components.
- Disconnect the electrical connector and vacuum line from the VVT solenoid.
- Use a wrench or socket
- Clean the area around the VVT solenoid with a clean rag to remove any dirt or debris.
- Install the new VVT solenoid in place of the old one. Use the bolts and tighten them to the manufacturer's specifications.
- Reconnect the electrical connector and vacuum line to the new VVT solenoid.
- Reinstall any components or parts that were removed earlier.
- Refill the engine oil and replace the oil filter if necessary. This is optional but recommended, as it helps to ensure proper lubrication of the engine's components.
- Reconnect the negative battery cable.
- Start the engine and check for any leaks or abnormalities.
These are general steps, and the specific process may vary depending on the vehicle. It's important to follow the manufacturer's recommended procedures and use the proper tools to avoid damage to the engine and ensure proper operation of the VVT solenoid. If you are not comfortable performing this task yourself, it's recommended to have a qualified mechanic replace the VVT solenoid for you.”